Professional videography
In recent years, many of us have needed to up our game in video recording, but we’re far from professionals. In order to meet our quality threshold and to ensure projects are planned and produced effectively, we engage professional videographers for our showcase film pieces.
As a rule, if a film or video piece has a lifespan beyond a few weeks, it should be professionally produced. All high impact content, including corporate and student recruitment films, documentary pieces, and films designed to provide an insight into life at Herts will always require a professional videographer involved in all stages of production.
The guidance below applies to the professionals, but also to colleagues briefing projects out, with regards to wide internal communications and any external communications. For help with teaching recording, please contact the Library and Computing Services Helpdesk.
If you’re looking to produce more ‘disposable’ content, check out our guide to filming yourself and others.
Visual Identity
Any video content that will represent the brand of the organisation will have to adhere to our new Visual Identity.
This means that elements such as the pacing of the video, the style of shots and other factors such as music and colour grade must be considered especially if a recruitment or core branding video is being considered.
This aim is to capture the potential, ambition, and energy of our staff, students and partners and portray the diversity and opportunity offered by our organisation.
All effort must be made to gather authentic content and avoid ‘staged’ looking shots as this can put off or even discourage the viewer about the environment at the University. With the ever-increasing amount of content on social media, especially the viewership age of potential prospective students who have grown up with video content; they are savvier at picking up on staged content. So where possible the filming of real lectures, interactions and moments are key.
More information and examples can be found here.
Before you begin (Preproduction)
People digest professional-quality video on a daily basis, whether on TV, steaming services or on social media, and therefore expect a high expectation of quality. Anything that falls below this will be instantly noticeable and can have a negative impact on the reputation of an organisation (especially one that teaches film production!).
Before you embark upon filming any kind of film aimed at promoting the University, its courses or services, you should take the following into consideration.
Planning
However small or large the project, you must ask yourself: Have I planned this properly with a clear goal in mind? Is video the best format for this message? Do I have the skills and means to make this a success?
Filming a lecture, promotional video or even a social media post takes time to properly plan, film and edit in order to achieve high-quality output. Ensuring that the content is engaging and that the video is of a high technical standard is paramount to gaining the trust of your audience.
Resources
Filming requires multiple resources in order to ensure delivery of a finished product. Please keep in mind whether you have access to the required technology: a camera, microphone, tripod for example, and whether you have the technical knowledge to use these devices. Consider whether you will require additional people to either help film or act as contributors on screen, as this will require other people's time, and potentially budget. You should always consult the Digital and Creative Experience team before you commit to filming.
Who, what and where?
Who you are filming? Do you have consent to use their image and likeness? Are they the right person for the job? Have you considered the diversity of people featured in any given piece?
What is the content of the video? Is video the appropriate format? Whether it be an interview or promotional video about a course or project, ask yourself if this piece is relevant, necessary and engaging.
Where is the filming taking place? Have you scouted and booked a suitable environment? Does that environment help to tell your story? Ensure the space you are filming in is either representative of the content or works to showcase the University's modern, open campuses and that any debris including water bottles, coffee cups, bins and other visual distractions are removed from the frame.
Is the content accurate?
All content published by the University should adhere to CMA guidance. Ensuring content is factual and can be proven is of the highest importance. Even testimonials which include opinion (for example, interviewing a student on their experience at Herts) should be checked for accuracy.
Will the content go out of date?
If your video is to be shared publicly, you must ensure that any content that may be subject to change is highlighted to Marketing and Communications. Failure to do so risks the film misleading viewers. When interviewing students about their experiences at the University, try to ensure content is personal and reflective ie 'I had the opportunity to...' rather than 'There is the opportunity to...'.
Top tips for powerful interviews
The comfort of the contributor during filming is paramount; being in front of the camera can be a daunting experience especially for the first time.
These tips will help you to maintain a professional yet friendly atmosphere resulting in good quality, useful content:
- From first contact with the contributor make sure to give them accurate and in-depth information about the filming and answer any questions they may have
- Meet the contributor on time at a pre-scouted location
- Maintain a conversation with them, try not to leave them in silence while you prepare/get ready. Ask how they are and chat about their subject, always seem curious to know more. This informal conversation will lead to a more natural conversation on camera
- Position the contributor somewhere they won't have distractions within their field of vision. Isolate any noise if you can
- Have them sit or stand in comfort. Ask them to find a comfortable position where they are not straining themselves, or they will slouch and fidget over time
- Make sure the lighting is not too intense. Check if they are squinting because the lights are too bright
- If you are using a lapel microphone ask them politely to pass the microphone up through their clothing and clip it on the outside near or on the collar. If they are wearing something that does not allow this such as a long clothing, run the microphone over their shoulder
- Ask the contributor to either look straight at the lens (piece to camera) or directly at you/the interviewer (interview). If you are recording alone then let them know you may glance at the equipment from time to time, and they should try not to be distracted by this
- Reassure them that if they fumble or make a mistake that they can go back and redo that segment
- Check the subject looks presentable and politely notify them if they have any loose hairs on clothing, a bent collar etc. by pointing to that area on yourself
- During interviews, keep the contributor talking. It is not an interrogation with set questions, but a conversation that you happen to be filming. If they feel relaxed and can see you are interested, the passion for their subject will come through
- Use your intuition. Explore and enquire about related matters that may lead to interesting content. If you feel they have skimmed over an important subject, ask questions to uncover more information. It’s better to have too much content than too little
- Thank the contributor for their time, ensure they have signed an Image Rights Consent form and that they are able to contact you or a colleague in future
- Please find the link to our consent form here.
On the day (Production)
Composition
It is important to spend time considering the composition of your shot. Unusual or awkward framing of your subject gives the impression of an amateur production and can be a distraction for the viewer.
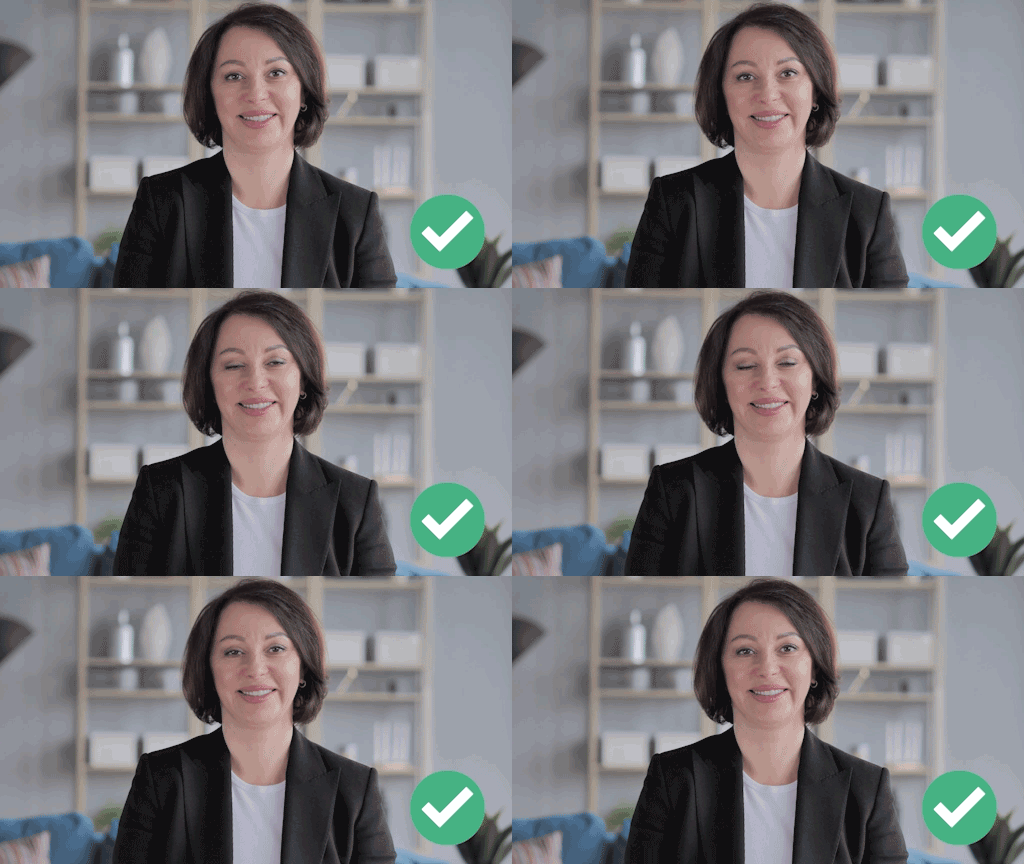
Pieces to camera: Keep the interviewee central and looking down the lens of the camera
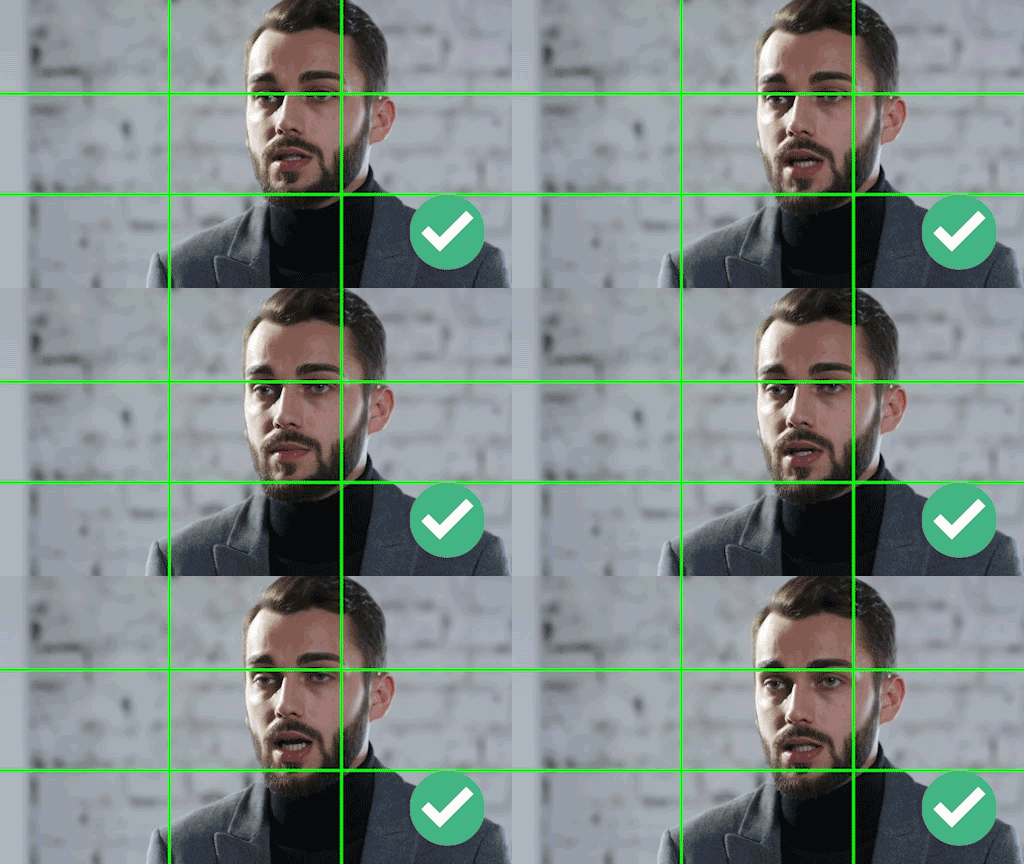
Interviews: Abide by the rule of thirds, with the interviewee looking off to the side of the camera

Keep the camera level with the subject's eyeline

Avoid shots where the subjects are seen at an odd angle

Avoid shots where a second camera is used too far to the side of the subject

Do not allow too much headroom

Avoid cropping off the subject’s crown

Avoid interviewees looking to the wrong side of the screen
Lighting
Ensure flattering and professional lighting is used. If lighting equipment is not available then use as much natural light as possible, either facing or at a slight angle to the subject. Avoid hard one-sided lighting from any direction as this can be unflattering. Ideally you will use diffused lighting.

Avoid shooting or presenting footage that is too dark (underexposed) and avoid bright backlights

Avoid shooting or presenting footage that is or too light (overexposed) or includes harsh unflattering lighting
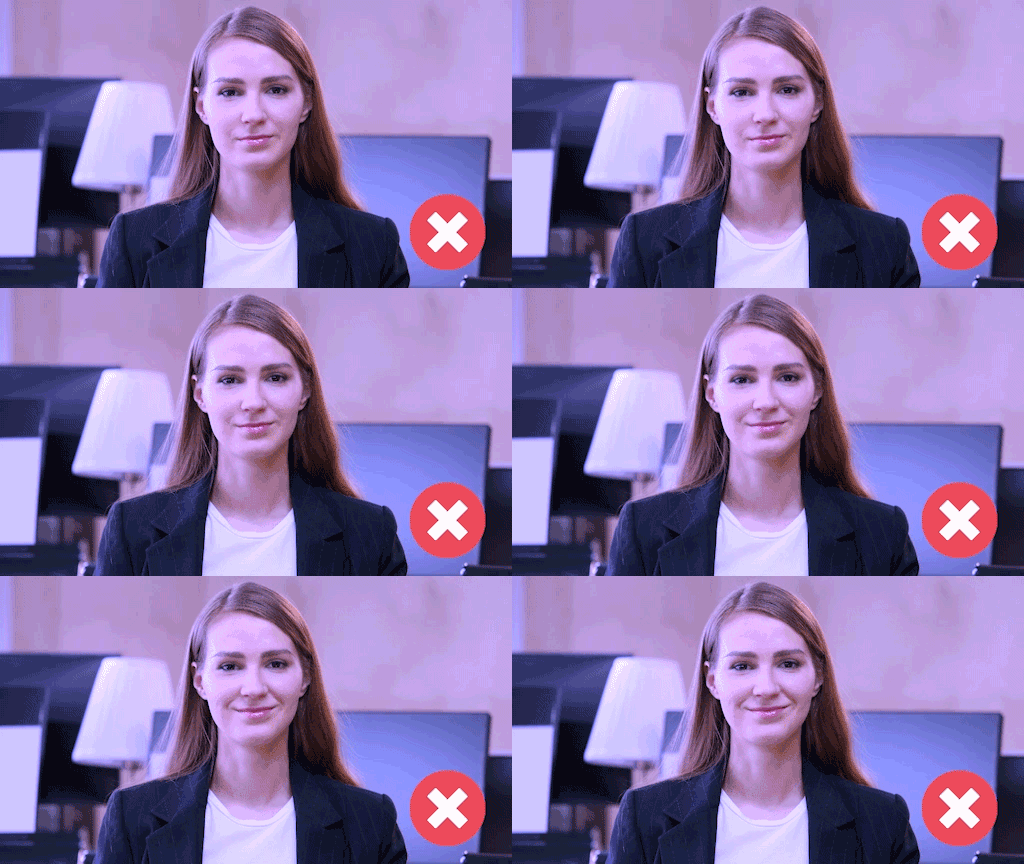
Ensure the white balance is set correctly, errors can leave the subject's skin looking washed out
Sound
Please ensure a high-quality sound recording is captured. Use a lavaliere microphone or boom microphone for formal interviews or a handheld microphone for informal vox pops.
Minimise background noise such as traffic, air conditioning, machinery or other sources of unrelated sound. If other people are nearby, politely request they lower their volume for the duration of the interview.
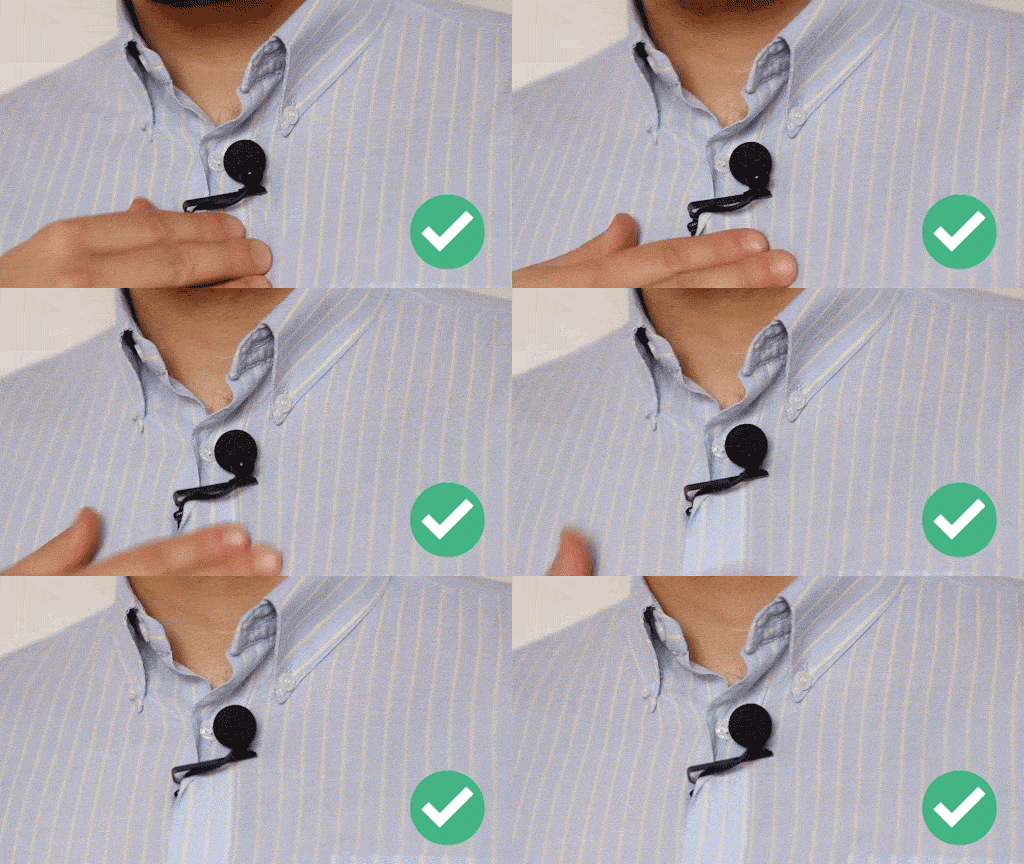
Hide lavaliere microphone wires under clothing – politely ask the subject to run the microphone up under their clothing

Do not leave cables exposed, as this can cause a distraction both to the subject and the viewer
Putting it all together (Postproduction)
Sound Editing
For internet-based content such as YouTube sound levels should be as high as possible without distorting the audio.
- Music must not be so loud to make the subject’s dialogue difficult to hear
- Please reduce any noise floor if a subject’s quiet voice has been turned up too high
Normalise the max peaks of your audio to –1 dBFS in the edit with the Master level of your dialogue hovering around -4db to -8db.
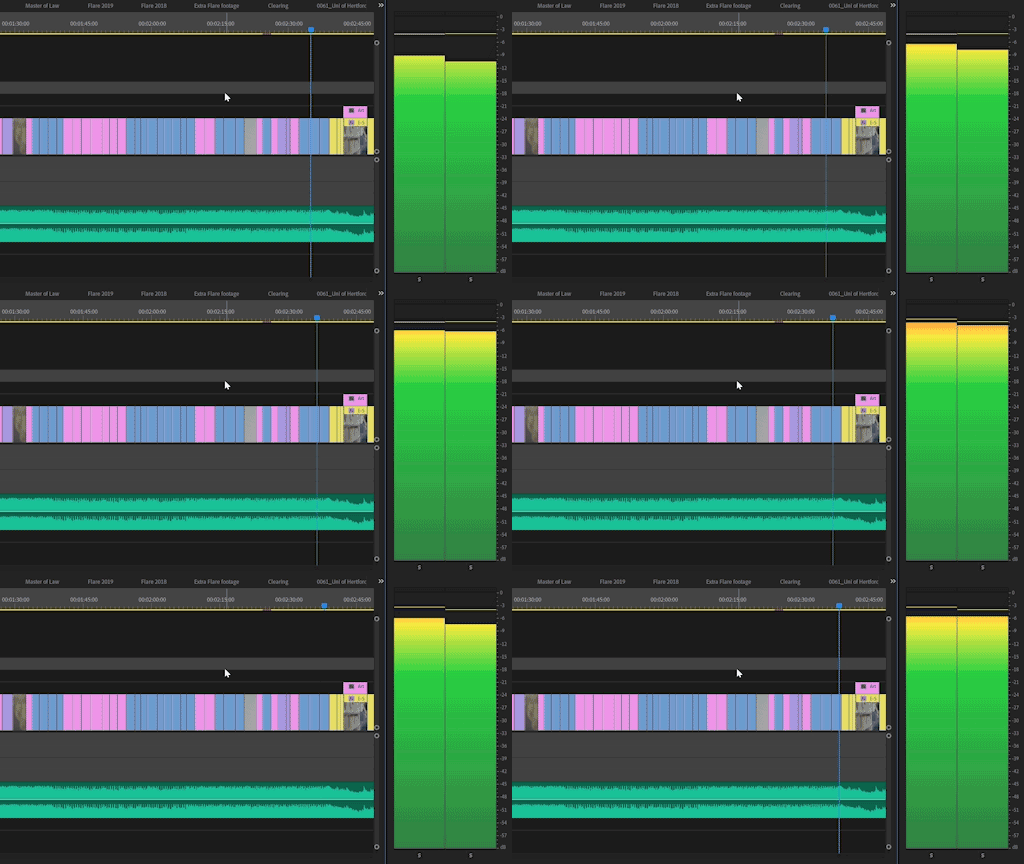
Normalise the max peaks of your audio to –1 dBFS in the edit with the Master level of you dialogue hovering around -4db to -8db.
Premiere Pro has a Limiter that can be used as a blanket effect to avoid distortion.
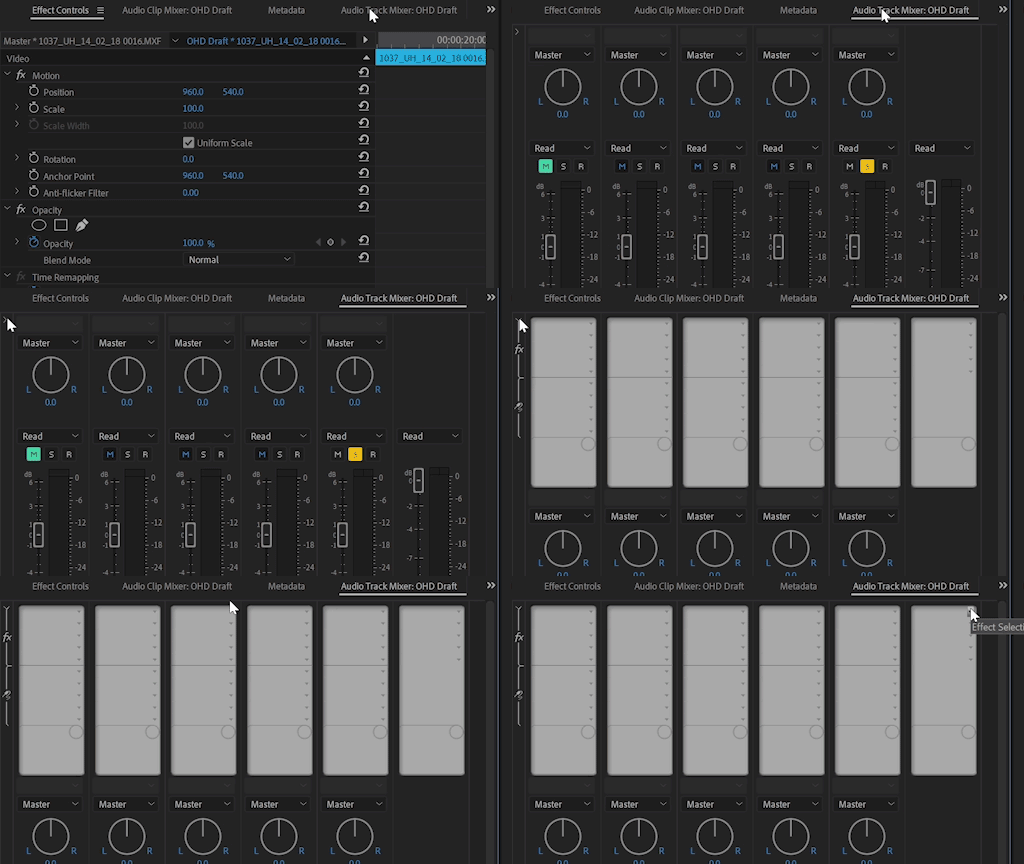
Select Audio Track Mixer window
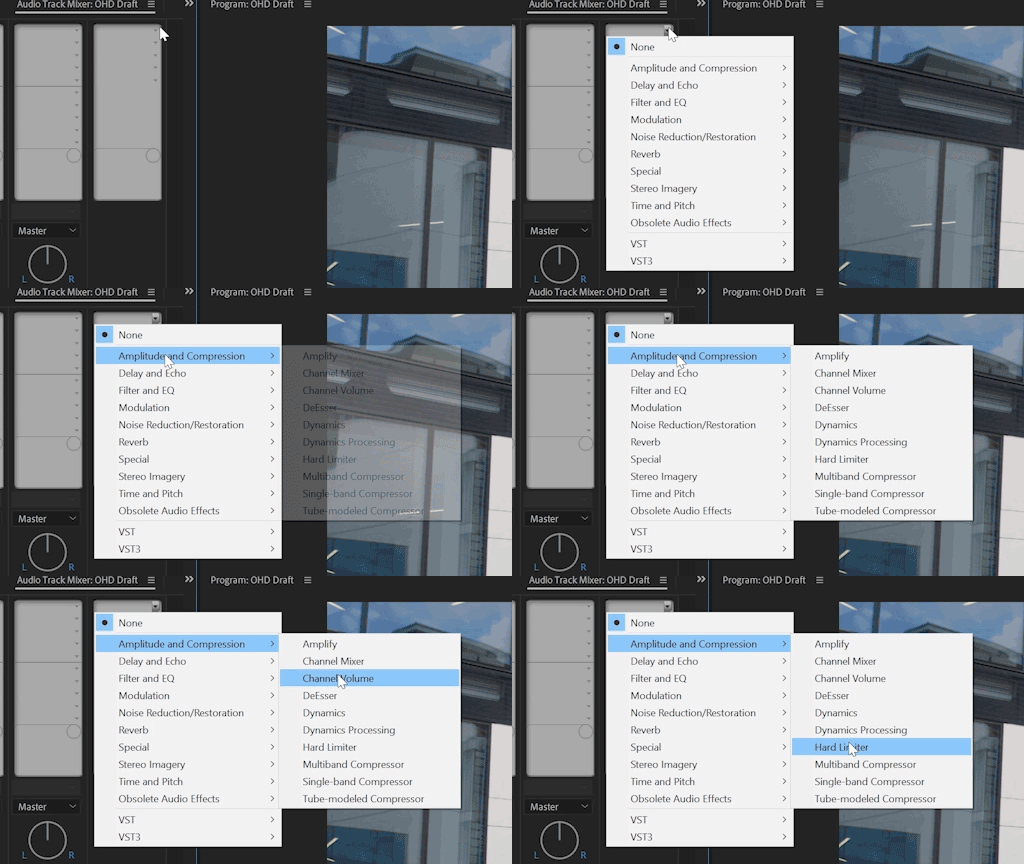
Click on the first drop down arrow, select Amplitude and Compression then click Hard Limiter
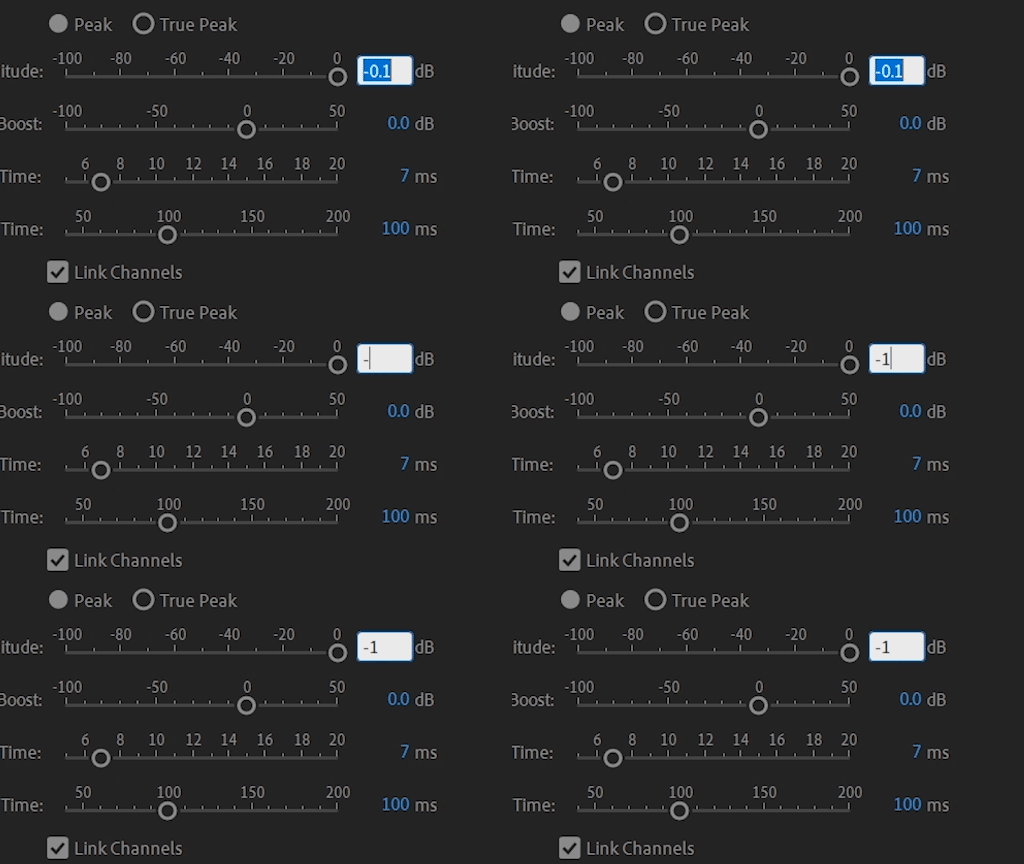
Change Maximum Amplitude to -1dB
For platforms requiring a specific audio rating such as LUFS (a European standard) such as video on demand services, use a loudness radar (Premiere Pro has a built in application for this) set to -16 and -20 LUFS unless otherwise stated.
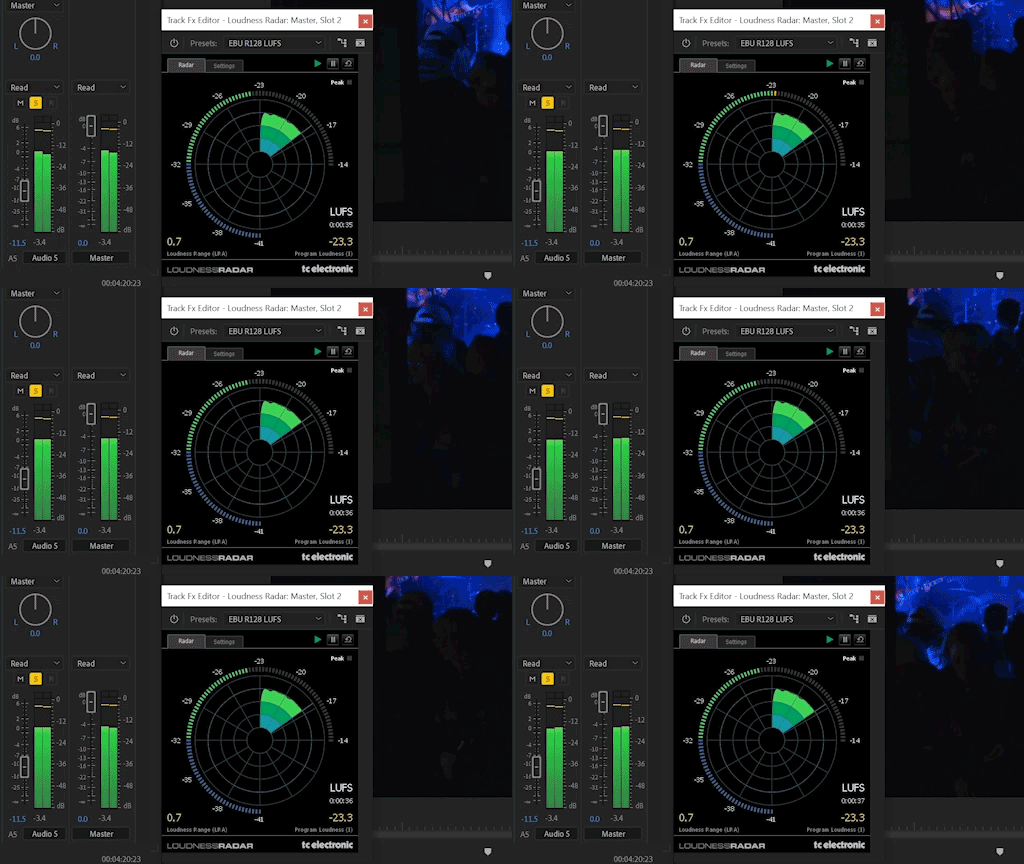
-18 LUFS is the sweet spot for dynamic content with music, sfx, dialog and VO
Colour Grading
Please ensure that you avoid clipping highlights and crushing the shadows creating an image that is too high contrast. Avoid washing out or desaturating a subject’s skin tones as well as the overall colour of the shots. Aim for a colourful and well-exposed shot.
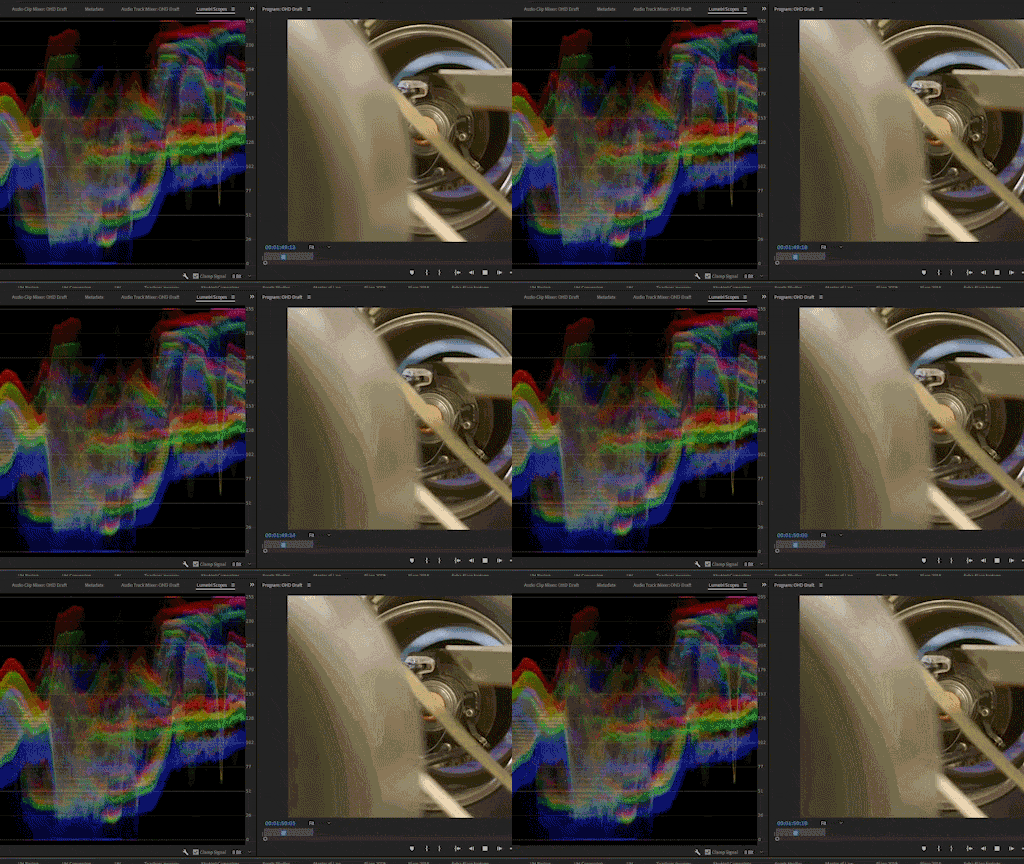
Use Lumetri scopes (if in Premiere Pro) to determine if your white balance is incorrect and if your overall colour grade is too dark/bright
Branding
Any video that will be published on the Universities website, social media channels or shared with external agencies for public viewing will need to adhere to our brand guidelines.
For more extensive graphics such as lower thirds and infographics please contact the graphic design team studio@herts.ac.uk or fill in a briefing form.
If the video is for audiences other than public and corporate audiences or student/staff communications for example research summary videos detailing study findings, then alternative graphics can be sourced but the correct logos and fonts detailed in the brand toolkit must be followed.
Exporting
In order to achieve maximum quality output, the final file should be delivered in Apple ProRes or a similar high-quality H.264 file.
All versions prior to the final 'gold' film should be labelled as 'draft', ideally with a title card embedded at the start of the film.
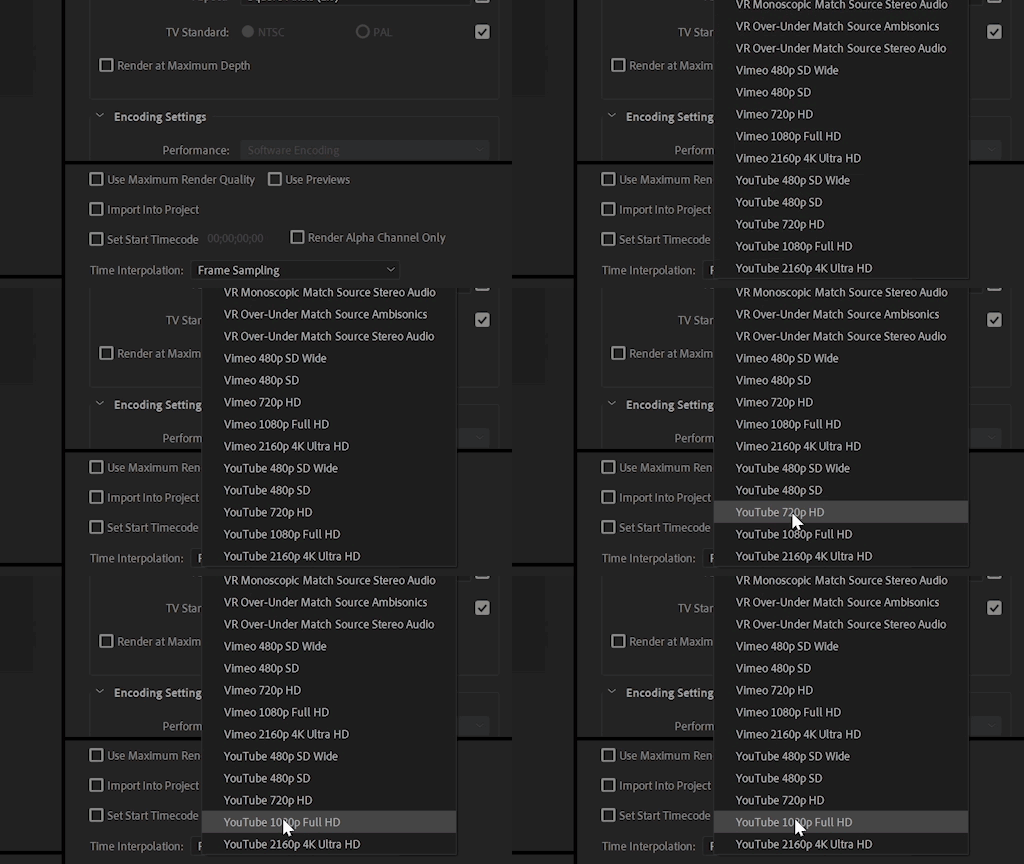
H.264 is a widely used codec that offers high quality with small file size, it’s a great codec for a very wide variety of uses
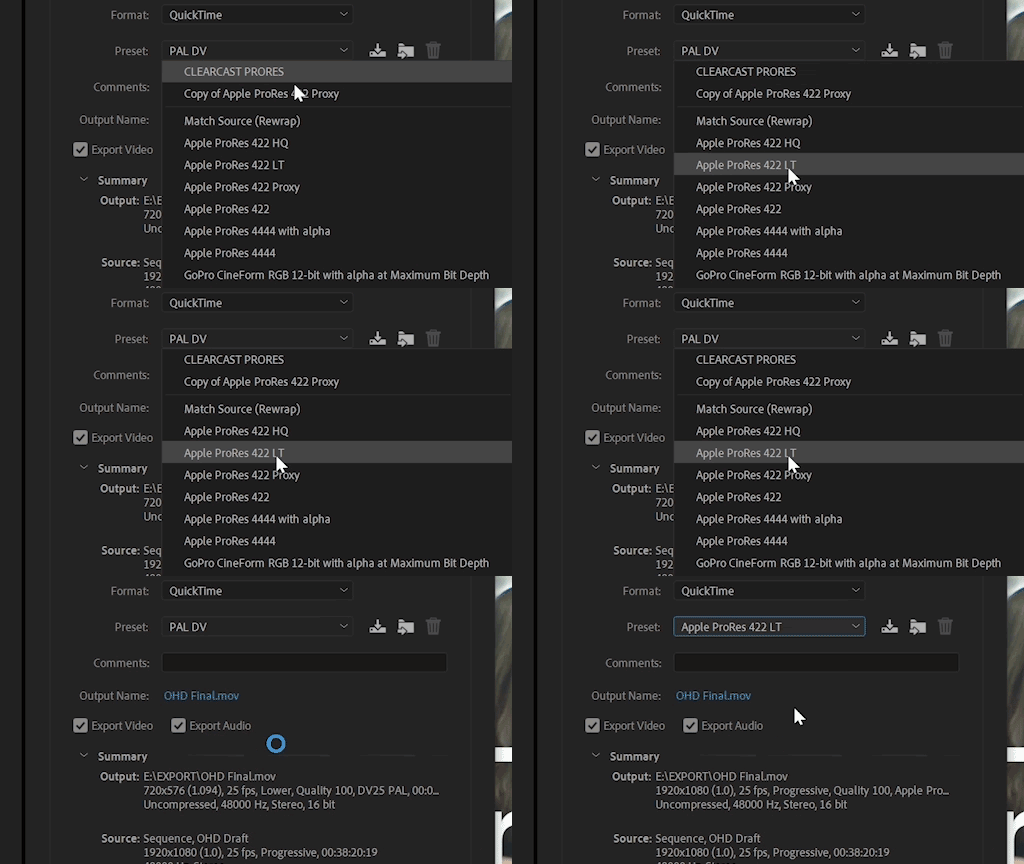
Apple ProRes is a professional-quality codec that ensures a high quality but normally results in a vastly larger file size than H.264
Platform-specific settings
Related Guidance
Get in touch
If you have any questions please contact a member of the team:
| Contact | |
|---|---|
| Studio team, Marketing and Communications | studio@herts.ac.uk |
| Jak Kimsey, Head of Digital and Creative Experience (he/him) | j.kimsey1@herts.ac.uk |
| Marketing and Communications Business Support | marketinguh@herts.ac.uk |
